
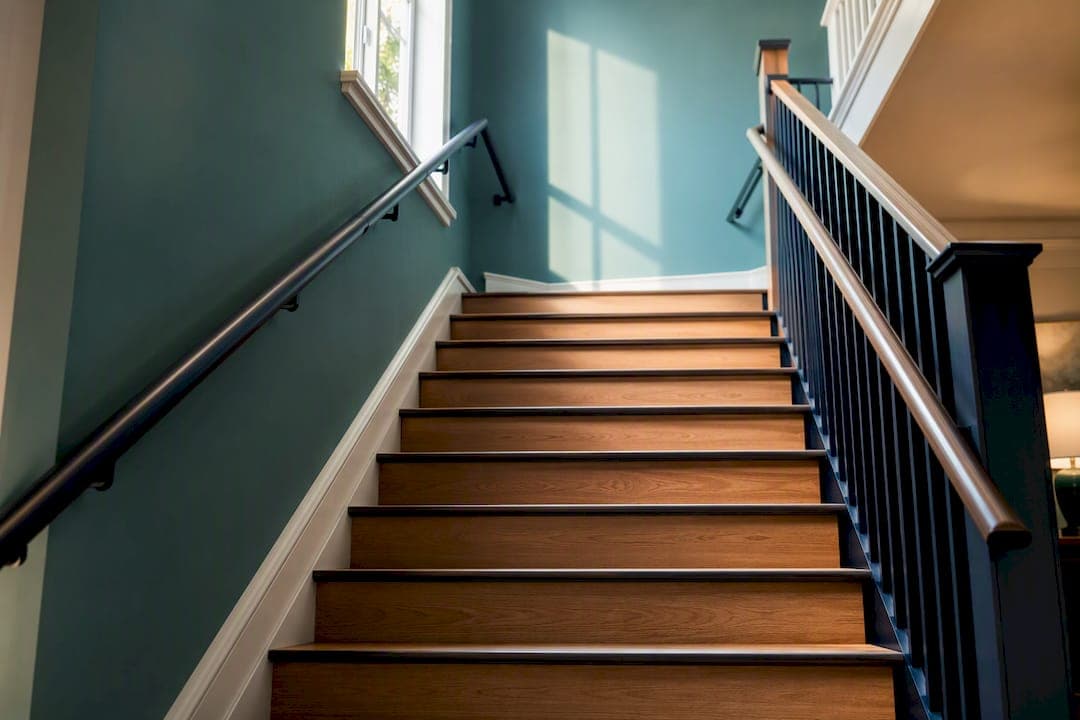
The five changes that cut stair-fall risk fastest are handrails on both sides mounted at the recommended height according to safety guidelines, bright switches at the top and bottom of the stairs (or motion lights if rewiring isn't realistic), non-slip traction on every tread, high-contrast strips on step edges, and a landing that's completely clear of clutter. These small, layered fixes prevent most stair falls when they're all in place together. If balance, vision, or memory issues are part of the picture, loop in an occupational or physical therapist before you do anything else.
TL;DR:
- Installing handrails anchored into wall studs on both sides at the correct height is critical, as drywall-mounted rails can fail under weight.
- Bright, glare-free lighting at both the top and bottom of stairs significantly reduces fall risks, especially during transitions and at night.
- Applying high-contrast strips on step edges and marking the last riser with contrasting colors improves visibility for low-vision users.
- Regularly inspecting and maintaining surfaces, handrails, and lighting prevents gradual deterioration that could cause accidents over time.
- For those with mobility issues or multiple falls, transitioning to a single-level home or installing a stairlift should be seriously considered rather than relying solely on hardware fixes.
Table of Contents
- Stair Safety for Seniors: Your Fix-It Priority List
- Handrails: What "Safe" Actually Means
- Lighting That Keeps Every Step Visible
- Traction and Surfaces: Stopping Slips Without Adding Trip Hazards
- Marking Edges and Fixing Uneven Steps
- Everyday Habits That Lower Your Risk Today
- When Fixes Aren't Enough: Stairlifts and One-Level Living
- What an OT, PT, or CAPS Professional Actually Checks
- Redesigning Stairs for Real Accessibility
- Keeping Stairs Safe Over Time: What to Check and When
- Teaching Safer Stair Habits, Not Just Fixing Hardware
- Being Ready If a Fall Happens Anyway
- Canes, Walkers, and Navigating Stairs Safely
- Aging Solo's Take: Two Small Moves That Change Everything
- How Agingsolo Helps You Prioritize and Plan
- Where to Go for Official Guidance
- Sources
- FAQ
Stair Safety for Seniors: Your Fix-It Priority List
Not every fix carries the same weight, and you don't need a contractor for most of this. Start with what's cheap, fast, and highest impact. Save the bigger jobs for when you've got a weekend and maybe a handyman.
Do this first (this week, under $50, no contractor needed):
- Remove any rug, mat, or shoes sitting on or near the steps
- Add motion-activated plug-in lights at the top and bottom landing
- Apply adhesive high-contrast nosing tape to each step edge
- Check both handrails by pulling hard, sideways and down
Do this soon (this month, may need a helper or pro):
- Add a second handrail if only one side has one
- Install rubber treads or anti-slip strips on bare wood or worn carpet
- Replace any burned-out bulbs with brighter LED equivalents
- Have a carpenter re-anchor any rail that wobbles
Handrails: What "Safe" Actually Means
A handrail that looks solid can still fail you completely. The National Institute on Aging recommends handrails on both sides of every staircase, mounted 30 to 36 inches above the tread, running continuously from the top step past the bottom landing. That last part trips people up literally: a rail that stops one step short leaves you grabbing for air right where you need support most.
Graspability matters as much as height. Your hand should be able to wrap fully around the rail, which means round or oval profiles work far better than wide, flat "decorative" rails that look substantial but give your fingers nothing to close around.
The single biggest installation mistake is mounting into drywall instead of wall studs. A rail needs to hold your full body weight in a stumble, not just your palm's resting pressure, and AARP notes that drywall-only anchoring is one of the most common DIY failures in home stair repairs.
- Test it yourself: grip the rail and pull hard, downward and sideways, at several points along its length
- Any flex, wiggle, or creak means it's not anchored into studs
- If you're not sure where the studs are, a carpenter can find them and remount the rail properly in under an hour
Pro Tip: A rail bolted into just one stud near the top usually feels sturdy until you lean your full weight on the far end. Ask an installer to anchor into at least two or three studs along the run, not just one.
Lighting That Keeps Every Step Visible
Most stair falls happen at the top or bottom transition, the exact spots where people misjudge where the steps start or end. AARP's stair safety guidance points out reachable switches at both ends of the staircase as one of the most overlooked fixes, since nobody should have to climb or descend a flight in the dark just to find a light switch.
If rewiring isn't in the budget, motion-activated plug-in lights solve the same problem in minutes. LED sconces along the wall or thin strip lights fixed under each tread's edge give you even coverage without the glare that a single overhead bulb can throw across a stairwell.
- Add switches (or motion lights) at both the top and bottom landing
- Choose LED fixtures that spread light evenly instead of one bright, glaring bulb
- Check for shadowed steps in the middle of the run, not just the ends
- Avoid fixtures that shine directly into a person's eyes while descending
Even, glare-free light does more for fall prevention than almost any other single upgrade, and it costs less than most.
Traction and Surfaces: Stopping Slips Without Adding Trip Hazards
Non-slip surfacing works only if it's actually secured. AARP's recommendations include adding traction to bare treads, and you have real options depending on what your stairs are made of. Adhesive anti-slip tape is the cheapest fix for wood or tile stairs. Rubber stair treads offer more cushion and durability for heavily used staircases. Low-pile carpet, glued or stapled down (never a loose runner), gives softer footing on wood. Slip-resistant paint or coating works well on outdoor or basement steps.
Loose runners are their own hazard, not a solution: an edge that curls up becomes something to catch a toe on. So does a floor transition where carpet meets tile unevenly at the base of the stairs.
- Check monthly for peeling tape edges or lifting carpet
- Look for curling runner edges, especially at the top and bottom steps
- Clean treads seasonally so grip isn't lost to dust or polish buildup
- Replace worn carpet before it thins to the backing
Marking Edges and Fixing Uneven Steps
Your eyes need a clear signal of where each step ends, and plain wood or beige carpet doesn't give you one. High-contrast nosing strips or a painted stripe on every step edge, a fix AARP specifically recommends, make the tread boundary obvious even in dim light or with lower vision.
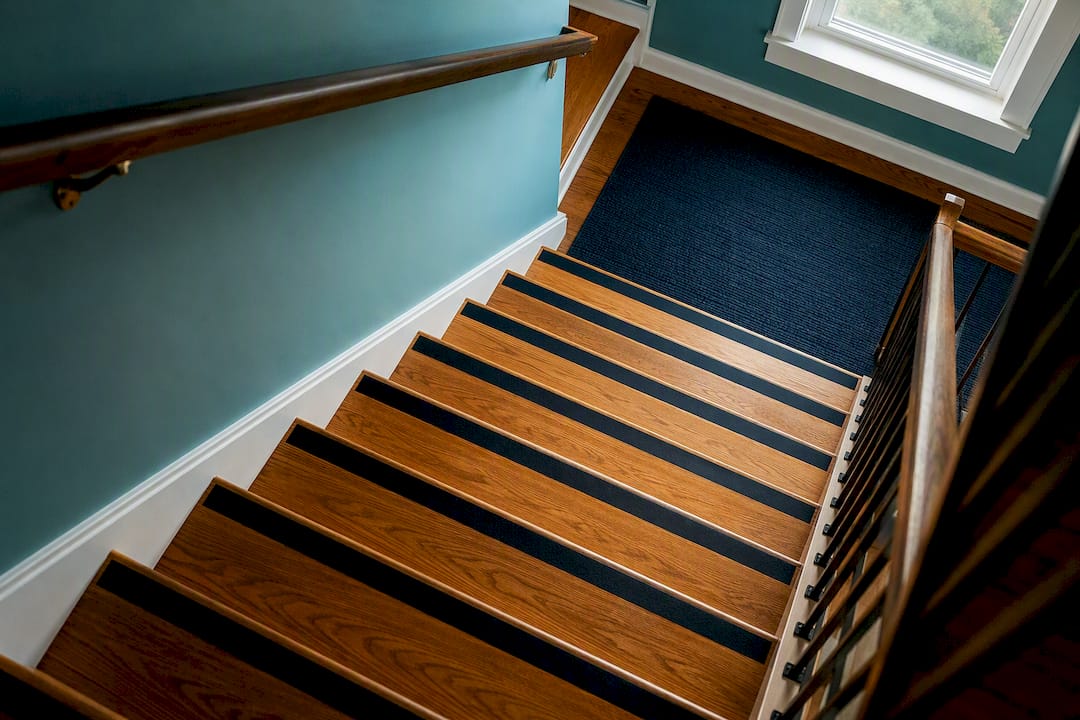
Watch for the bottom-step illusion, too: the last step often blends into the landing floor, and people misjudge it and stumble on the final stair more often than any other. A contrasting strip on that last edge, or a distinctly colored floor mat placed just past it, corrects the problem.
Uneven risers (steps that vary in height by even half an inch) are a structural hazard, not a cosmetic one. If you notice one step feels different underfoot, that's not something tape fixes. Call a contractor to level the risers or add a permanent nosing edge.
Everyday Habits That Lower Your Risk Today
Small routine changes protect you as much as any hardware upgrade. None of these cost anything.
- Keep every step and both landings completely clear. Nothing gets "just set down" on a stair, ever.
- Wear low-heeled, slip-resistant shoes on the stairs. Skip socks-only feet and floppy slippers entirely.
- Move deliberately: hold the rail, take one step at a time, and never carry an armload that blocks your view of the treads.
When Fixes Aren't Enough: Stairlifts and One-Level Living
Sometimes the smartest move isn't another upgrade to the stairs themselves. If you've had a fall, a string of near-misses, or your balance and mobility are declining, it's worth stepping back and asking whether the stairs should stay part of your daily routine at all.
A stairlift lets you keep your whole house in use, but it comes with an upfront cost, ongoing maintenance, and it doesn't help if you also struggle with transfers in and out of the seat. Reconfiguring so bedroom, bathroom, and kitchen access all sit on one level costs more to set up in most cases but removes the stair question entirely going forward, an approach explored in Aging Solo's guide to single-floor living.
- Repeated near-misses or an actual fall are strong signals to escalate, not wait it out
- Progressive mobility decline (a cane becoming a walker, for instance) is another
- A clinician's recommendation should carry real weight in this decision
- Get two or three local quotes before committing, and ask about financing or funding assistance programs in your area
What an OT, PT, or CAPS Professional Actually Checks
A generic checklist can't account for your gait, your medications, or how your vision has changed. That's the gap a professional home assessment fills. An occupational therapist focuses on how you actually move through the space day to day. A physical therapist digs into balance and strength. A Certified Aging-in-Place Specialist (CAPS) brings the construction side, translating clinical findings into actual modifications.
These assessments typically include a sit-to-stand test, a single-leg balance check, a review of medications for side effects like dizziness, a vision screening, and direct observation of how you climb and descend your own stairs. That last piece matters: NIA research notes that tailored assessments consistently outperform generic advice once balance or gait problems are present, because a therapist can see exactly where your foot placement or grip timing breaks down.
The output isn't just a list. It's specific training on how to navigate your particular staircase, plus contractor referrals for whatever structural work the assessment turns up.
Redesigning Stairs for Real Accessibility
Sometimes the smartest fix isn't a rail or a light. It's rethinking the stairs themselves. If your home has an entry with just two or three steps, a low-slope ramp can eliminate the hazard entirely rather than mitigating it, especially useful for anyone using a walker or wheelchair some of the time.
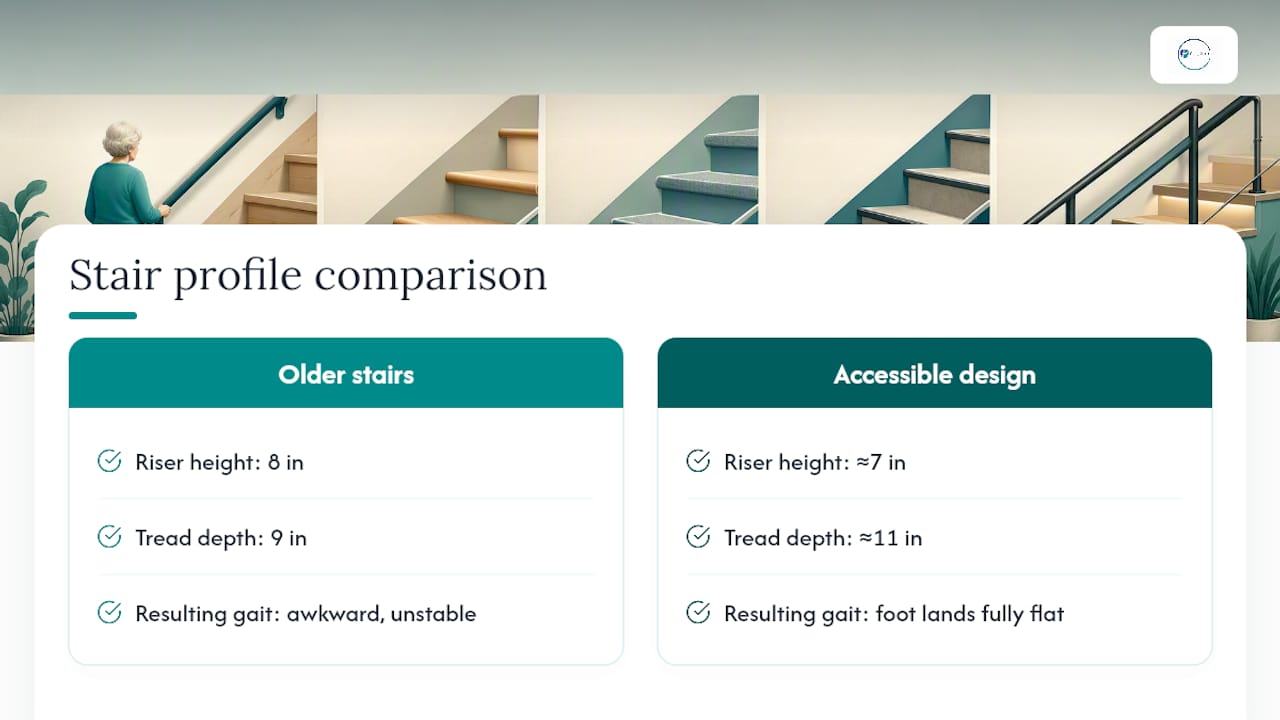
For interior staircases, reducing individual step height, called the riser, and increasing the depth of each tread makes a genuine difference. Steeper, narrower stairs built decades ago often have 8 inch risers with 9 inch treads, a combination that forces an awkward, unstable gait. Modern accessible design guidance favors risers closer to 7 inches with treads around 11 inches, which lets your foot land fully and flat instead of balancing on a partial edge.
If a full rebuild isn't realistic, a contractor can sometimes add a mid-flight landing to break up a long run of steps, giving you a resting point and cutting the number of consecutive risers you have to manage at once. Widening a narrow staircase to accommodate a walker, or adding a second rail where only one existed, are smaller renovations that still meaningfully change how safely you can use the space.
None of this needs to happen all at once. Prioritize the section of stairs you use most, get a contractor's opinion on what's structurally possible, and treat the rest as a longer-term project rather than an emergency.
Keeping Stairs Safe Over Time: What to Check and When
A staircase that was safe last year doesn't stay that way automatically. Wood swells and shrinks with the seasons, hardware loosens with use, and carpet compresses in the exact spots your feet land most often. Building a simple inspection habit catches problems while they're still cheap to fix.
Walk the full staircase every few months and press down firmly on each tread, feeling for give, creak, or any sense of softness underfoot. Check every handrail bracket for looseness, since even a properly stud-mounted rail can work its screws loose over years of grip-and-pull use. Look at nosing strips and anti-slip tape for peeling corners, since a curled edge is a trip hazard you just created while trying to prevent one.
Seasonal changes deserve their own look. Wood stairs often shift slightly with humidity swings between summer and winter, which can turn a flush nosing into a slightly raised lip. After any heavy use, like moving furniture up or down, recheck the rail anchors and tread surfaces for new damage.
Bulbs matter more than people think. A dimming or flickering stairwell light often gets ignored for weeks, quietly recreating the exact dark zones you fixed months earlier. Put stairwell bulb checks on the same schedule as your smoke detector batteries so it doesn't slip your mind.
If you're the one keeping an eye on someone else's home, a quarterly walk-through with a phone camera works well: photograph the treads and rails, and compare against last quarter's photos to catch gradual wear you might otherwise miss by eye alone.
Teaching Safer Stair Habits, Not Just Fixing Hardware
Hardware only works if it's used correctly, and a lot of stair falls trace back to behavior, not a broken step. Rushing down stairs to answer a phone, skipping steps to save time, or descending backward while carrying a laundry basket are common patterns that override even a well-lit, well-railed staircase.
Caregivers can help most by modeling calm, deliberate stair use themselves rather than lecturing about it. If you notice a loved one gripping the wall instead of the rail, or leaning on furniture near the landing instead of reaching for the handrail, that's worth a gentle conversation, not a scolding one. It often signals the rail is mounted in the wrong spot for their reach, not that they're being careless.
Medication timing deserves attention too. Some blood pressure medications and sedatives cause brief dizziness on standing, and the moment right after getting out of bed or off the couch is exactly when someone heads for the stairs. Talking through timing with a doctor, or simply pausing 10 to 15 seconds before starting to walk after taking certain medications, prevents a specific and common fall pattern.
Involve the person using the stairs in every decision about them. Someone who feels their independence is being managed rather than supported is more likely to skip the rail out of quiet resentment than someone who chose the fixes themselves.
Being Ready If a Fall Happens Anyway
Even with every fix in place, it's worth planning for the moment something still goes wrong, because a fall on the stairs often happens somewhere a phone isn't within reach. A wearable medical alert pendant or wristband solves this directly, letting someone call for help without crawling to a landline.
Keeping a charged phone or a second landline extension near the base and top of the stairs closes the same gap for anyone who prefers not to wear a device. Smart speakers with voice-activated calling offer another layer, letting a simple spoken phrase reach a neighbor, family member, or emergency line without any button to press.
If you live alone, a support circle who knows your general schedule, and who'd notice if you didn't answer a check-in text or call by a certain time, matters as much as any device. Aging Solo's guide to emergency planning for adults living alone walks through building that kind of network step by step.
Practicing the plan matters more than owning the device. Know how long it would realistically take for help to arrive, and make sure whatever alert system you choose is one you'd actually reach for in a moment of pain or disorientation, not one that sits in a drawer because it felt like a hassle to wear.
Canes, Walkers, and Navigating Stairs Safely
Using a cane or walker on stairs takes different technique than using it on flat ground, and getting it wrong is its own fall risk. With a cane, the rule of thumb is "up with the good, down with the cane": lead with your stronger leg going up, and lead with the cane going down, keeping the cane on the side opposite the handrail so you can use both supports at once.
Standard walkers are trickier. Most aren't designed for stairs at all, and many falls happen when someone tries to fold a walker or drag it up behind them. If stairs are a daily reality and a walker is part of the picture, a physical therapist can teach a specific technique, or recommend leaving a second walker at the top and bottom of the stairs so neither trip requires carrying one.
Whatever device is in use, the handrail still comes first. A cane or walker supplements balance; it doesn't replace a secure grip on a properly anchored rail. If the two ever compete for the same hand, the rail should win.
Aging Solo's Take: Two Small Moves That Change Everything
Picture the 2 a.m. bathroom trip: half-asleep, no light on yet, one hand out for a wall that isn't quite where memory says it is. That moment, more than any daytime scenario, is where stair fear actually lives. It's not weakness to feel it. It's just what happens when a familiar space stops feeling reliable in the dark.
You don't need to overhaul the house tonight. Pick one rail and make sure it's anchored into studs, and add motion-sensor lighting at the top and bottom landing. Those two moves alone close most of the gap that makes stairs frightening at night.
Fixing this isn't about giving something up. It's about keeping the freedom to move through your own home, on your own terms, with a little smart backup in place.
— Mike
How Agingsolo Helps You Prioritize and Plan
Knowing which stair fix to tackle first, and how it fits into everything else on your plate as a solo ager, is its own kind of work. Agingsolo built downloadable checklists specifically for that: a way to walk through home safety fixes, budget them realistically, and know what to do next without staring at a to-do list that never shrinks.

Beyond the free tools, Agingsolo offers a paid 45-minute Solo Aging Clarity Session over Zoom for anyone who wants a second set of eyes on their whole plan, not just the stairs. A session can help you rank which home changes matter most for your specific situation, think through vetting a contractor, and start mapping out who's in your support circle if you ever need extra help. It's a natural next step once you've made the fixes in this guide and want a clearer, more personal plan for what comes after. Visit Agingsolo's guide to maintaining independence at home to see the full range of resources and book a session when you're ready.
Where to Go for Official Guidance
For deeper reading, the National Institute on Aging, AARP, the CPSC home safety checklist, and the World Health Organization's falls fact sheet all offer free, authoritative guidance. For hands-on balance training, Contemporary Rehab Services' exercise guide is a solid clinical-adjacent resource.
This article is general information, not a substitute for advice from a qualified doctor. Consult a qualified healthcare professional about your own circumstances before acting on anything here.
Sources
- Preventing falls in the home — National Institute on Aging
- Ways to make stairs safer at home — AARP
- Home Safety Checklist — U.S. Consumer Product Safety Commission
- Falls — World Health Organization
FAQ
What Height Should Stair Handrails Be?
Handrails should be mounted 30 to 36 inches above the tread, running continuously from the top step past the bottom landing without gaps.
How Do I Know If My Handrail Is Actually Safe?
Grip it firmly and pull down and sideways along its full length. Any wobble, flex, or creak means it's likely anchored into drywall instead of wall studs.
What's the Cheapest Way to Improve Stair Lighting?
Motion-activated plug-in lights at the top and bottom landing cost very little and solve the most common problem: navigating stairs in the dark without reaching for a distant switch.
When Should I Consider a Stairlift Instead of More Fixes?
Consider a stairlift after a fall, repeated near-misses, or progressive mobility decline, especially if a clinician has recommended reducing stair use.
Does Agingsolo Offer Personalized Help Beyond General Tips?
Yes. Agingsolo's paid Solo Aging Clarity Session walks through your specific stairs, budget, and priorities one-on-one over a 45-minute Zoom call.